1st go at HDR Photography

I’ve had a go at HDR (HighDynamicRange) photography.  I’ve heard about for a while and recently Googled to learn more and have a go.  There’s a fair amount of info on the web (including this bit now!), and loads of examples on Flickr.  It seems some people don’t like it, but for some shots, it does create a high contrast wow factor, which I quite like.

I’m no expert, but here’s what I’ve found out.  In short, it’s simply take at least 3 shots bracketed -2/ 0 / +2 stops.  Then with some HDR software, merge them together, and twiddle with the sliders till you have the effect you’re after.

There’s more to it than that really, and here’s what I’ve found out so far, including my first HDR image.

The images should align, else when merged, the result will be blurred:

Use a tripod! (if you’re steady, then hand held is possible)

void anything that moves, unless you want blurring on purpose such as waterfalls.

Depth of Field – you should use aperture priority to ensure consistent depth of field, and manual focus too sometimes, to avoid autofocus picking different points from shot to shot.

Once you have your shots, the next thing you’ll need is software to process the images to an HDR image.  It seems the most popular is Bracketing.  My camera (Olympus e620) will do auto bracketing, but only 3 shots and only +-1 stop.  My Googleling suggested, for the most part, that +-2 stops is better.  I haven’t experimented enough with 1, 2 or even 3 stops to be able to comment properly.  I’m using 2 stops if using tripod and, if I have to take shots handheld, then I use the camera’s one sop auto bracketing.

Photomatix from HDRsoft, but I stumbled across Picturenaut, a free alternative.  So “Free” will do for now, until I get a feel for how this stuff works and whether I like it.

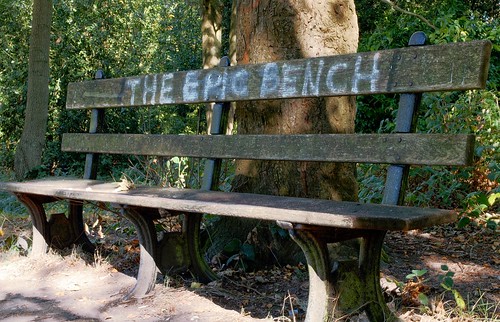
So here’s my first HDR image using Picturenaut.  This bench’s graffiti caught my eye, shot sunny day, with the bench half covered by shadow from trees above and behind.

The 3 shots were taken on a tripod with -2/ 0 and +2 stops respectively, then the HDR image below that.

Feel free to comment below.  I hope to report back with more HDR stuff soon.

The Epic Bench (-2ev) The Epic Bench (0ev) The Epic Bench (+2ev)

Here’s the finished image (on Flickr)

The Epic Bench in Royal Tunbridge Wells

Olympus e620 Grainy Film Art Filter

Grainy Film photo of Union FlagEver since moving to digital photography, I have often thought of taking black and white photos.  Thing is, I use the ‘take it in colour and convert some later with PhotoShop or similar’.  Theflaw in this approach is, at least for me, is I never seem to get round to trauling through the hundreds (thousands) of photos and converting them to black and white ‘just to see’.  Net result?  Very few black and white photos. 

Art Filters to the rescue!  Now I know there are many posts and reviews around the net that slate such functionality built into Digital SLR cameras, but I think it is useful, epsecialy for people like me, where the post developing never actually happens.  To some, the more experienced photographers, they may seem a bit gimigky, watering down the skill required to use a ‘proper’ camera.  However, not all of us are pros (yet 🙂 ), so please remember that folks.

Why is it useful?  The biggest reason is using the feature in situe gives you an immediate answer to the question “What would it look like in black and white?”.  Not only that, you can alter the shot to get it right there and then, something you may not be able to acheive in post developement. 

Another reason for me is it can inspire further creativity, as you see other nearby opportunities that might look good in black and white.  You almsot start hunting for black and white photos.

Whilst on can take photos in black and white on most digital cameras, the Art Filters on my e620 includes ‘Grainy Film’ filter.  This is the only Art Filter I use and I like it as it has a lot more contrast compared to the monochrome setting, which always seems a bit too grey.  It doesn’t always work though, and you have to play around with exposure to try and get it right as somethimes the detail you’re after, get’s lost in the black or the white.  Some shots just seem to come alive when the colour is taken out.

So that’s my waffly defence for the Art Filters on the Olympus e620, especially the Grainy Film one ;-).

[nggallery id=5]

Bloco Fogo Caught with Olymous e620

During early September, whilst out doing some Christmas shopping in Tunbridge Wells, my son and I heard some drumming!  It’s was a samba band.  We followed our ears to investigate and found Bloco Fogo playing in the centre by the clock tower.

Luckily I had my shiny new Olympus e620 with me, in the hope I’d have cause to use it, and I did!

After successfully pushing my way through to the front, using my son’s pram as a people plough, I attached the 50 to 150mm lens and started snapping away.

Now I must stress, at the time I was still getting used to the camera, and still am!  So despite taking quite a few shots, these are the only one’s worth uploading, the rest are either out of focus, wrong exposure, or naff composition.

Bloco Fogo are an Afro-bloco samba band from Kent www.blocofogo.com.  I’ve seen them before and have to say they are rather good, very loud, colourful and energetic.  So loud in fact, that my son covered up his ears for the duration!

What do you think?

[nggallery id=4]

I’ve bought an Olympus e620 D-SLR

Olympus e620 Twin Lens KitSince 2009 saw a landmark Birthday, and Christmas was looking, I thought it about time to move up from a digital compact camera and get myself a new toy, a Digital SLR.

Now many moons ago I used to dabble in photography with an Canon AE-1 of my Dad’s and then my own Canon A-1.  Quick to adopt digital I bought a Sanyo VPC-X350 in 1999, as it did video too.  Nothing special by today’s standard, but it was very novel being able to click away for free and check I got the shot there and then.  After a few years of that I bought a Canon PowerShot A520, as it had loads of manual features I’d missed since the days of film.  This served me well, until I updated to a Canon PowerShot A700, which has served even better and continues to do so now.

However, the capability of my compact camera is limited in certain situations and when asked to take some photos at a party, since I seemed to be the only one with a camera, I struggled.  The main problem was the very low light, under which the A700 struggled.  Whilst suitable stationary close up shots were OK, anything too rapid and I missed the action, through having to wait for the flash to re-charge.  Plus the range of the flash was just not far enough.  Afterwards, I thought: “wouldn’t it be nice to have a flashgun”.  Alas the A700 has not hot shoe, but that was enough, coupled with the up and coming Birthday to think about getting something more powerful.

The journey to the e620 had started, though I didn’t know I’d end up with one.  At first, I thought I’d look at some of the larger compacts, or ‘Bridge’ cameras that could accommodate a flash gun.  The hope was this could be an affordable option, as budget was tight.  There was no chance of blowing 4 figures on a load of semi-pro stuff.

To my surprise, the cost of these hybrids seemed to top the budget SLRs.  The more I looked the more I got confused on what I should get.  Great sites like http://www.dpreview.com, steves-digicams.com, www.ephotozine.com,  and www.photographyblog.com gave me a big insight into the pros and cons of cameras available, as it’s all to easy to fall for the manufacturer’s jargon.

I narrowed the search to the Canon EOS 500D, Nikon D5000, the new Pentax K-x and the Olympus e620.  Now the Pentax was initialy the most interesting, since it was available in red.  Now I know that’s no reason to choose a camera, but I was very tempted.  I was tempted too by it’s use of AA batteries which is something I find very handy on holiday with my Canon PowerShots.  Hoever, the reviews and forum threads on capacity with AA was appaling and scared me off.  So time to compare the other 3.  I thought I’d best see them in the flesh and that’s when I liked the e620.  It’s compact, lightweight (as are the lenses thanks to in-body stabalisation) and has an articulated screen (something I find very useful on my video camera).  Many folks said it’s important to be comfortable with the camera in hand, and the e620 drew me in.  I was no longer tempted by the HD video of the others, as it seems D-SLRs are not thr right format for recodding video, espceically when auctoficus ins’t available whiclt recording, or apature control, etc…  Video cameras as good for video and at the moment, it seems, D-SLRs are still best for stills.

So to sum up, why I bought the e620?

  • I liked it in the flesh
  • In body image stabilization.
  • Versatile articulated screen – great when at the back of the crowd, or for self portrait.
  • Loads of features – most of which I feel I need and enough to keep my mind occupied for a while.
  • Image quality, that whilst might be pipped at the post by the Canon at high ISO, it’s still way ahead of what I can acheive with my PowerShot 700.
  • Price – I got a twin lens bundle 14-42 and 50-150mm that I couldn’t find anything near to for the Canon or Nikon.

I’m not going into detail about the pros and cons compared to the rest, as there’s plenty of good reviews out there, that have already done that.  What I do hope to do, however, is blog ‘living with an Olympus e620’ as a new to Digital SLR user coming from a digital compact user’s perspective.

That’s it for now – time to read some more of the user manual – again